


.png)
.png)

.jpg)
How to tint a PowerPoint photo with a specific colour
‘Monochrome’ is usually used as a synonym for ‘black-and-white’. But it can also mean one colour in various shades. And this can be a useful way to present photos.
Why and when to use monochrome images
When you want your slides to look high-quality, one of the things to aim for is a consistent look-and-feel. Putting lots of images in a deck can mean that the multiplicity of colours distracts from the brand colours and dlitues the sense of connection from one page to the next.
Or perhaps you want the photos to feel more part of the background.
In both scenarios, monochrome can help.
But don’t use the PowerPoint ‘Recolour’ function
On the Format Picture tab sits a Recolor button that lets you apply a singel colour to a photo – which sounds exactly like what we are trying to achieve. But I have two major issues with what this does.
Problem 1: The colours often don’t match the palette closely enough. That might sound pedantic and picky, but if you have a muted colour palette you don’t want PowerPoint creating a more vibrant shade that doesn’t look quite right.
Problem 2: There’s no fine-grain control. You only have a choice of one ‘dark’ and one ‘light’ version of each palette colour. Ideally, you should be able to adjust the amount of the ‘colour wash’ depending on your image and palette.
Let’s look at an example in practice. Imagine we have the following slide, with a fairly simple image to accompany the contents. As it stands, it seems a bit too yellow against the teal colours.

The slide background is a pale, muted shade of the dark teal used for the title, so it would make sense to tint the photo with that accent colour. But if we apply the teal, it’s too vivid.

A more flexible way to create monochrome pictures
This is very straightforward. Three simple steps:
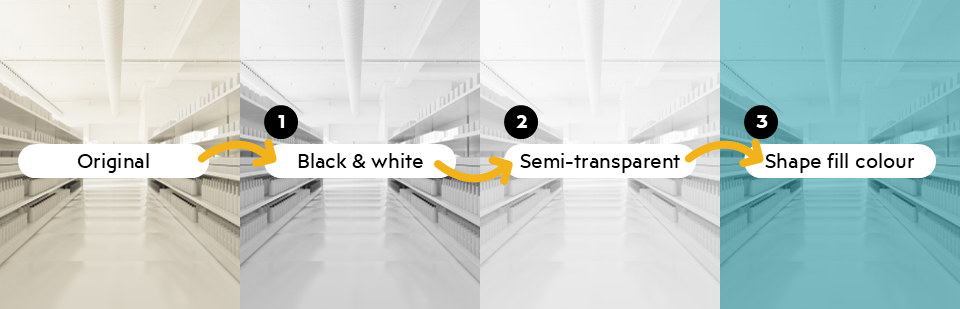
Step 1: Black and white

Set the image to black and white. Two ways to do this.
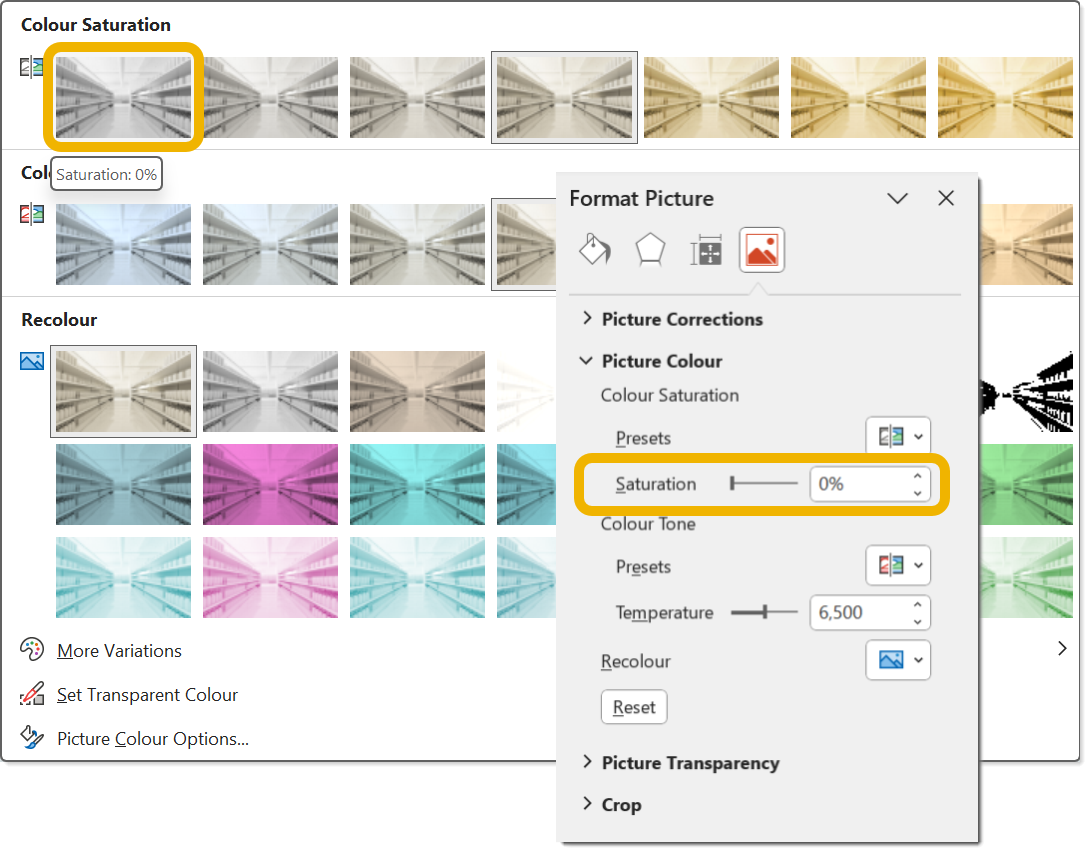
Option 1: use the Colour > Saturation 0% option (the first option on the first row).
Option 2: change the saturation to zero in the Format Picture pane. [Reminder: to open the Format Picture pane, right-click on the photo and select Format Picture… which has a little paint buclet icon next to it.]
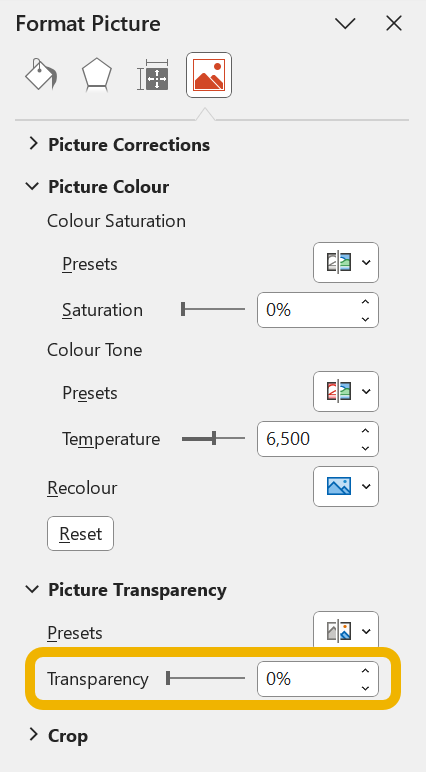
Step 2: Picture transparency
Make the image slightly transparent. The picture transparency option is near the bottom of the Format Picture pane. 50% is a good starting place. We can fine-tune this later.
In our case, the slide background is a pale teal, so that starts to come through. If your slide background is white, the photo would just look lighter.
Step 3: Picture Fill

Now add the colour. Simply set the shape fill colour of the photo as if it was a normal shape. Normally, this wouldn’t have any effect on a picture. But because we have just added transparency in the previous step, the colour seeps through.
So to use your brand colours, simply choose from your colour palette. We’re going to use the teal used for the four text boxes.
That might be all you need to do. In this case, the colour is still a bit overpowering, so we will do some fine-tuning.
How to fine-tune
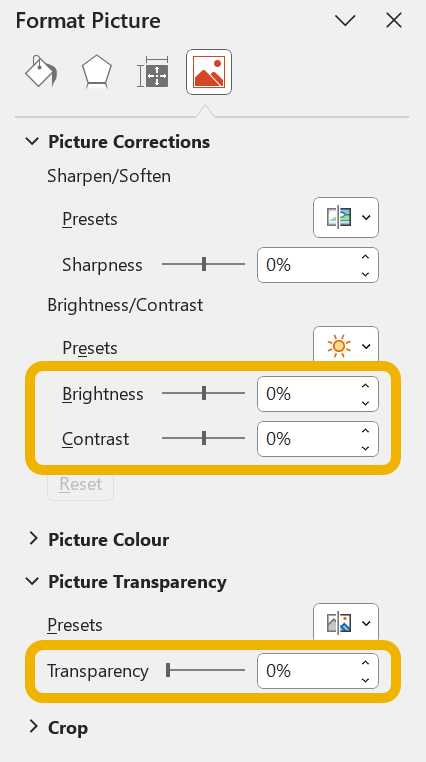
The above settings might work just fine for you. But depending on the photo and the colour you have chosen, you can adjust the mix of colour and photo. You have four levers that you can pull:
Lever 1 is the amount of transparency that you give the photo. Adjust this up and down to see what feels right.
Lever 2 is the brightness of the photograph. Try increasing or decreasing this slightly, especially if you have a particularly light or dark photo in the first place.
Lever 3 is the contrast. Because you have removed the colours, sometimes increasing the contrast slightly can help the content of the photo stand out.
Lever 4 is the fill colour that you are using. You might want to use a slightly lighter or darker shade of the colour. If the automatic shades in the palette don’t work, see the advanced tip below.
Note that with brightness and contrast you probably do not need to make massive changes. Those tools in PowerPoint are very sensitive and usually I don’t need to stray more than +/-25%.
In the example above, it looks better if I decrease the transparency of the photo from 50% to 33%. But in this case I have decided to leave brightness and contrast at zero:

You’ll want to experiment to see what looks best for your colours and photo.
Blending into the background
This tinted monochrome approach works especially well with blending the picture gradually into the background, like this:

Read about how to do that here.
Using the format painter
Because there are a few steps, it’s worth knowing that you can use the Format Painter brush to apply some of the changes from one photo to another: it will copy across the transparency and the fill colour. But it will not copy across any changes you made to the brightness or contrast.
Extra tip - keyboard shortcut for format copy & paste
CTRL+SHIFT+C (CMD+SHIFT+C on Mac) will copy the format to the clipboard.
And CTRL+SHIFT+V/CMD+SHIFT+V will paste it onto a new shape.
Useful if you have several photos through the deck, and it can be easier than double-clicking the paintbrush tool.
How to create custom shades of a colour
The five automatic shades that PowerPoint generates for your palette are done in a rather simplistic way. And for some colours, they just look wrong.
If you need a different shade of the same colour, follow these steps. These are for Windows, but you can apply the same principles on the Mac colour picker dialog.
Select the item whose colour you want to adjust.
On the Shape Fill dropdown choose More Fill Colours…
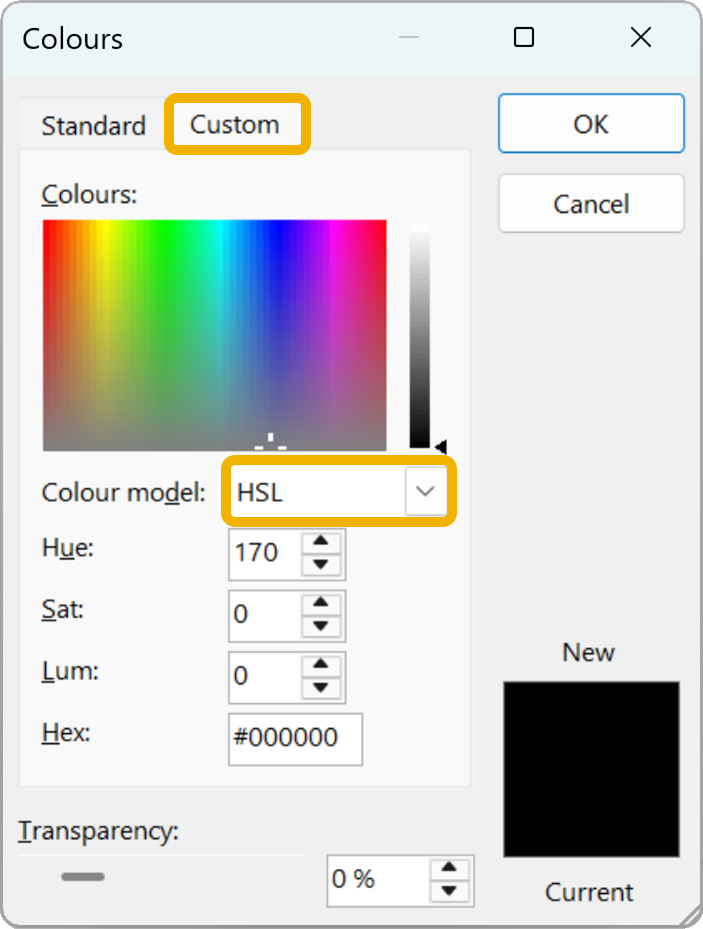
Click the Custom tab if it is not already showing.
Where it says Colour Model, this should default to RGB. You need to change it to HSL. HSL stands for Hue, Saturation and Luminance. If you are on a Mac, you’ll need to use the HSB option (Brilliance instead of Luminance).
Keep Hue the same. This number represents the colour, so leave this alone.
Adjust Saturation and Luminance. Without going into the technicalities, you generally want to increase one and decrease the other. So if you want a brighter, lighter colour, you would increase the luminance and then decrease the saturation. And vice versa for a darker shade. How much you do this is up to you, there’s no particular formula to use. When you have a shade you like, press OK.
If you find yourself using this colour adjustment frequently, I highly recommend the BrightSlide add-in. It makes this much easier – as well as dozens of other actions. I can’t recommend BrightSlide strongly enough. And it’s free!
Want more tips like this in your inbox?
It's useful*
It doesn't flood your inbox (monthly-ish).


